As MFA on EntraID
1. Introduction
Microsoft Entra ID allows defining as a Multi-factor Authentication Method (MFA) an external Identity Provider (IdP) based on OpenID Connect (OIDC) standard. That means, our Visual Passcodes service could be defined as a second authentication factor of any O365 authentication process.
This can be done adding our Visual Passcodes as an External Authentication Method (EAM) in the EntraID administration console. See:
- Microsoft Entra multifactor authentication external method provider reference
- https://learn.microsoft.com/en-us/entra/identity/authentication/how-to-authentication-external-method-manage
- Microsoft Entra multifactor authentication external method provider reference (Preview) - Microsoft Entra ID | Microsoft Learn
And as third-party information:
This guide explains the steps to follow for setting up Visual Passcodes as a second authentication factor for the current O365 authentication method.
2. Configure Visual Passcodes Tenant
Before configuring EntraID service for the O365 tenant, we need to configure an authentication tenant in the Visual Passcodes.
To this end, follow these steps:
2.1 Create the tenant
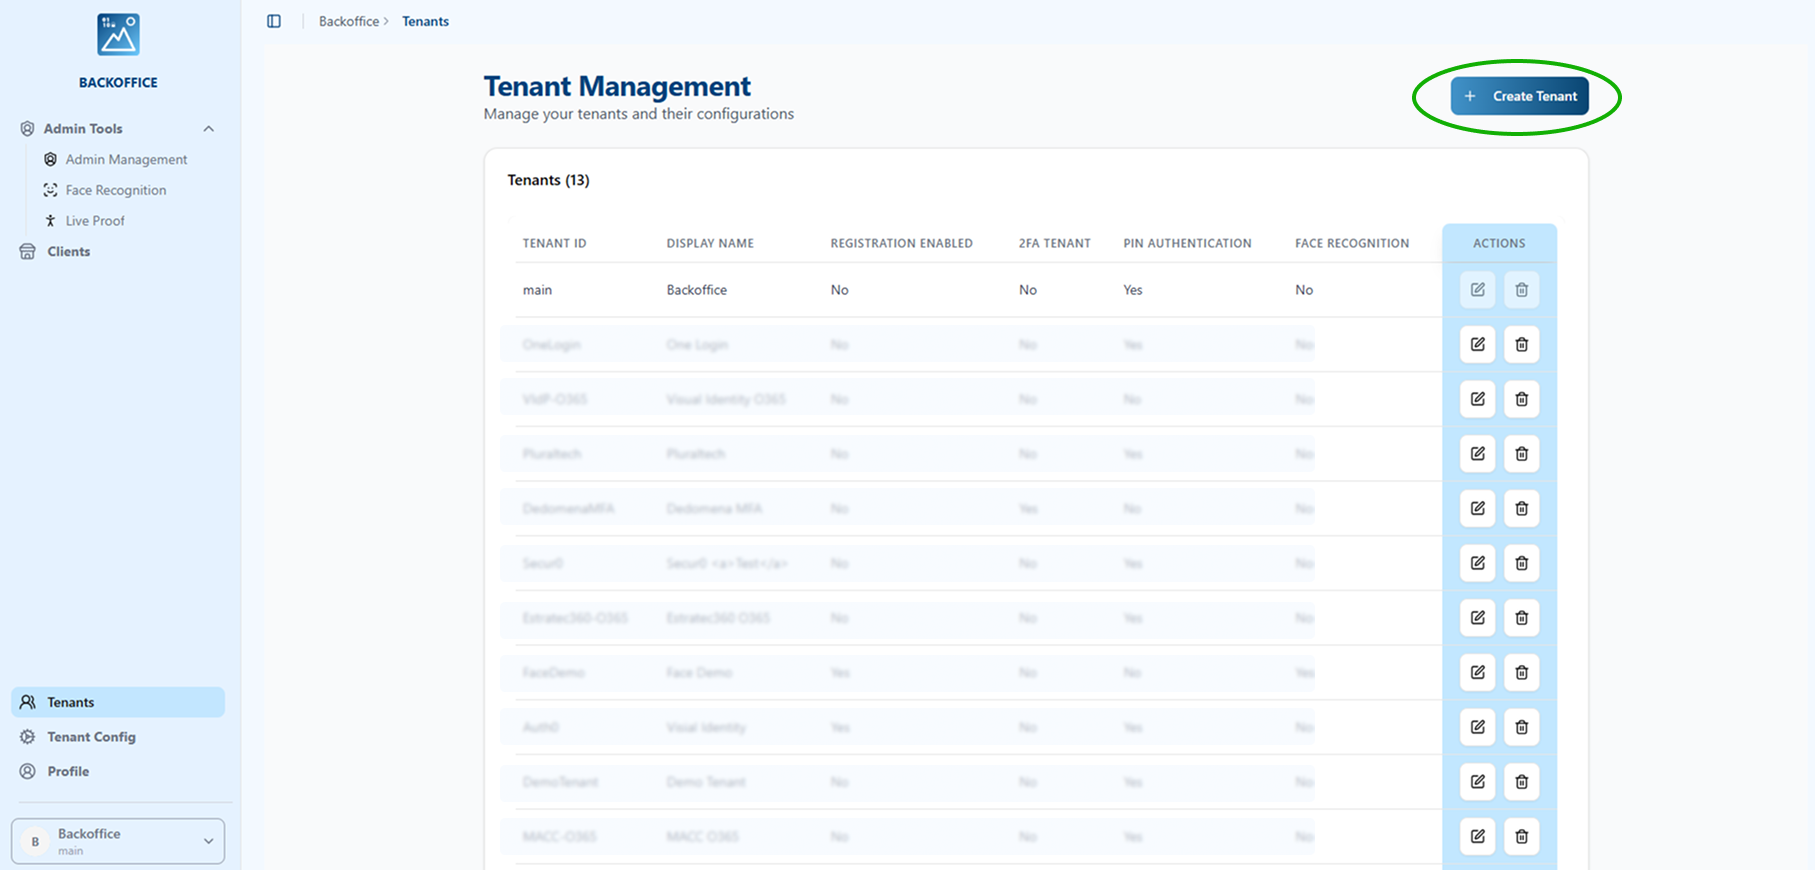
If you don’t already have a tenant, you need to create a new one. To create a new tenant you must have global admin permissions. We will provide basic configuration guidance here but for further information about tenant configuration check the Visual Passcodes manual available online.
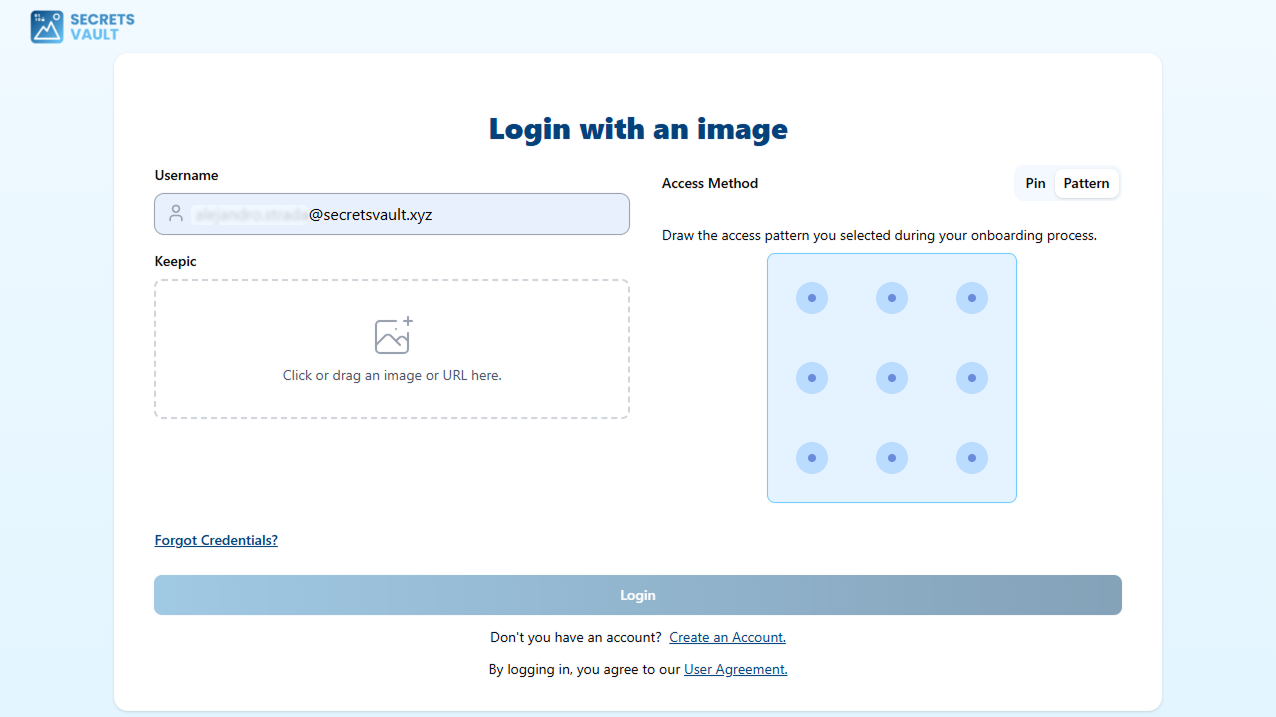
When creating the tenant in the Visual Passcodes Backoffice be sure that you do not select Two-factor authentication option. For instance, you can select PIN Authentication (required in addition to the image) or just leave it black (to just only require an image).

2.2 Configure tenant
Tenant configuration requires to setup a OIDC client related to the EntraID redirection source.
2.2.1 Select Tenant
If you are not already in the proper tenant, go to the bottom of the left menu and select your tenant from the drop-down menu.
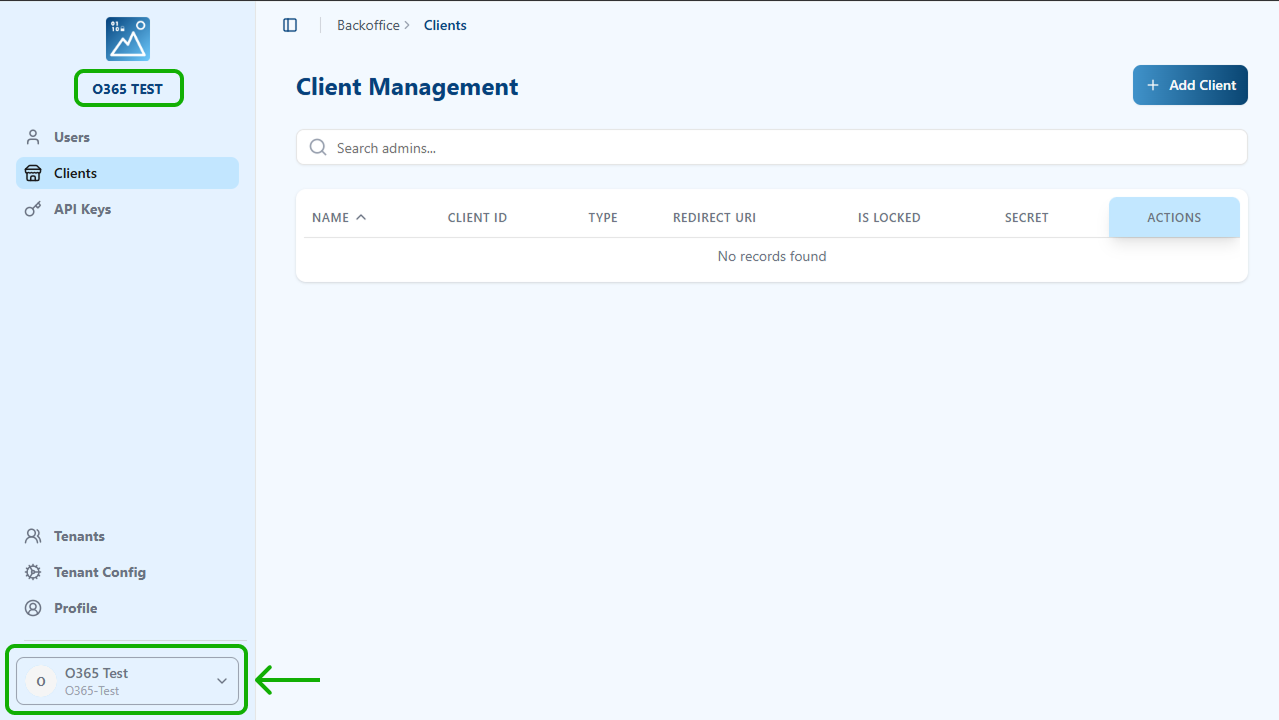
You can verify you are in the correct tenant by checking the tenant name under the logo on the top-left menu.
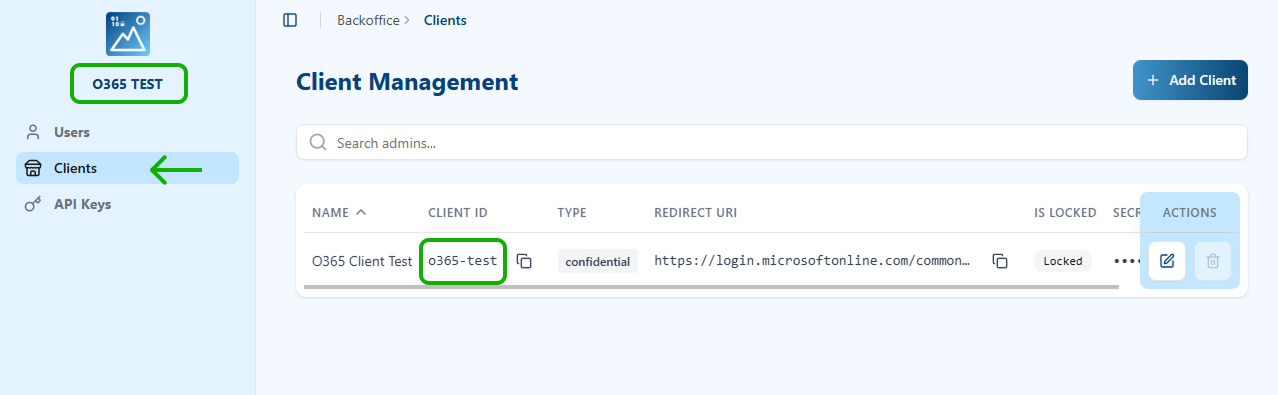
2.2.2 Create EntraID OIDC client
Select the “Client” option of the left menu and in the new page select the “+ Add Client button” located on the top left part of the page.
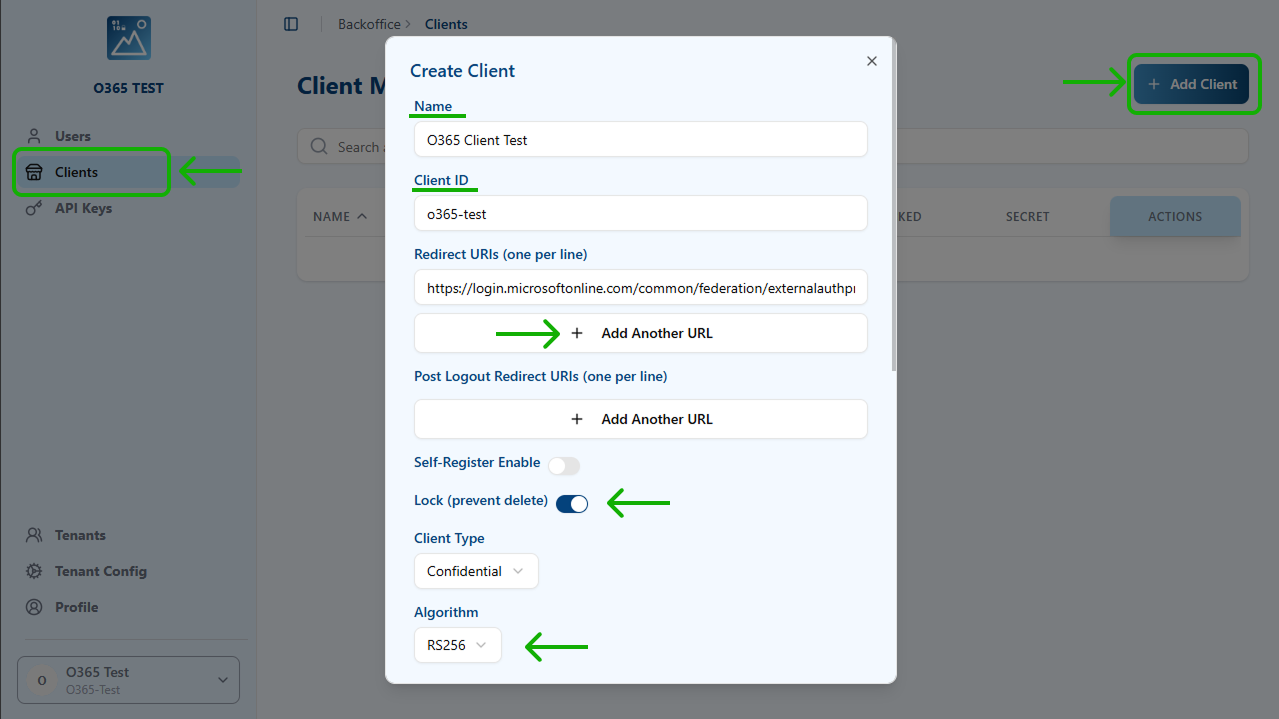
In the “Create Client” pop-up window, fill at least the following fields:
- Name: An easy to read name
- ClientID: an identifier internal name (it cannot contain spaces)
- Redirect URI:
- To add a URL, click in “+ Add Another URL” identifier
- For general Azure cloud, the general URL is:
However, for other environments the following ones need to be consideredhttps://login.microsoftonline.com/common/federation/externalauthprovider
- Azure Government Cloud
https://login.microsoftonline.us/common/federation/externalauthprovider
- Azure operated by 21Vianet
https://login.partner.microsoftonline.cn/common/federation/externalauthprovider
- Azure Government Cloud
- Lock: enable it
- Client type: confidential (by default)
- Algorithm: RSA256
- Logo: The public URL to a logo of the company.
- Special Flow: This section (at the end of the form) is relevant to support EntraID, since it has an special authentication requirements. Click on the arrow button to expand it.
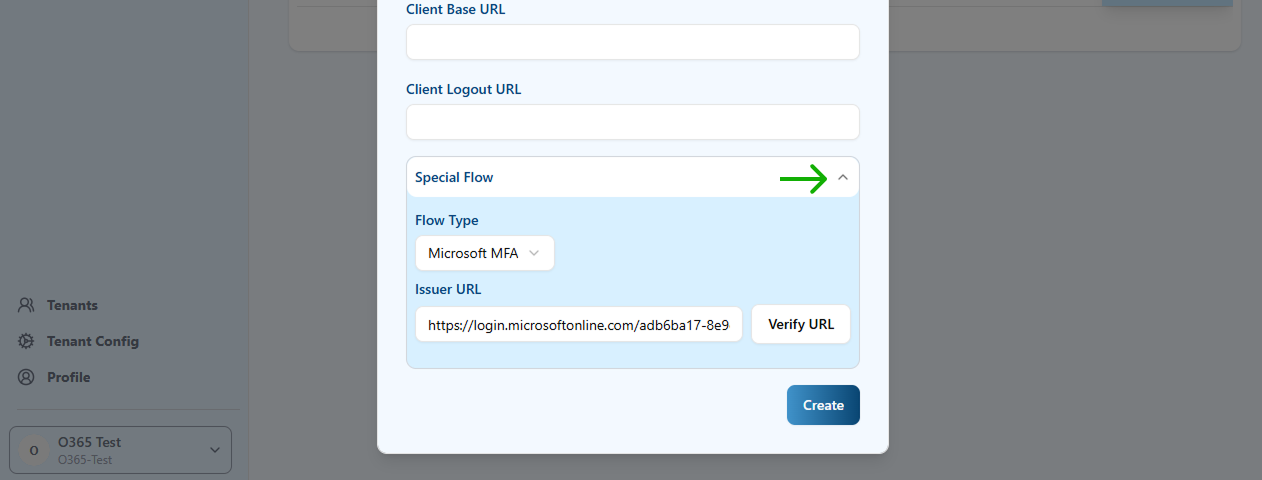
- Flow type: Select “Microsoft MFA”
- Issuer URL: You need to provide the OAuth 2.0 authorization (v2) endpoint base URL. It has the following format:
You can get thehttps://login.microsoftonline.com/${Tenant_id}/v2.0
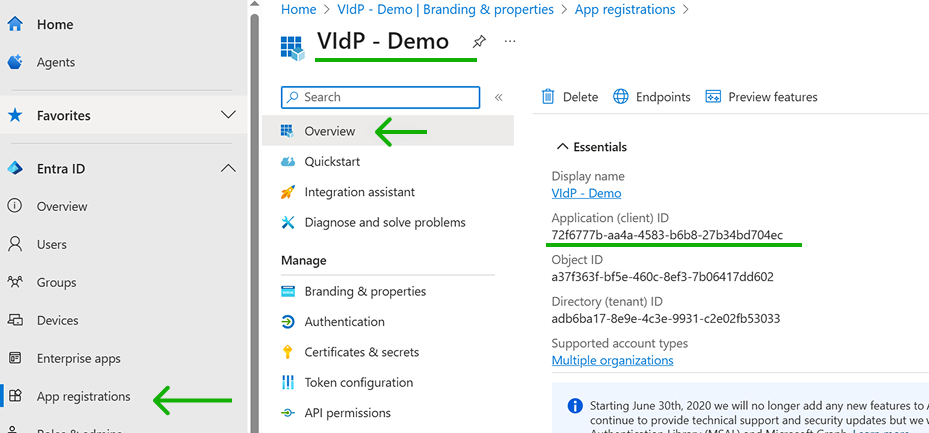
${Tenant_id}value from EntraID admin center, in the Overview menu entry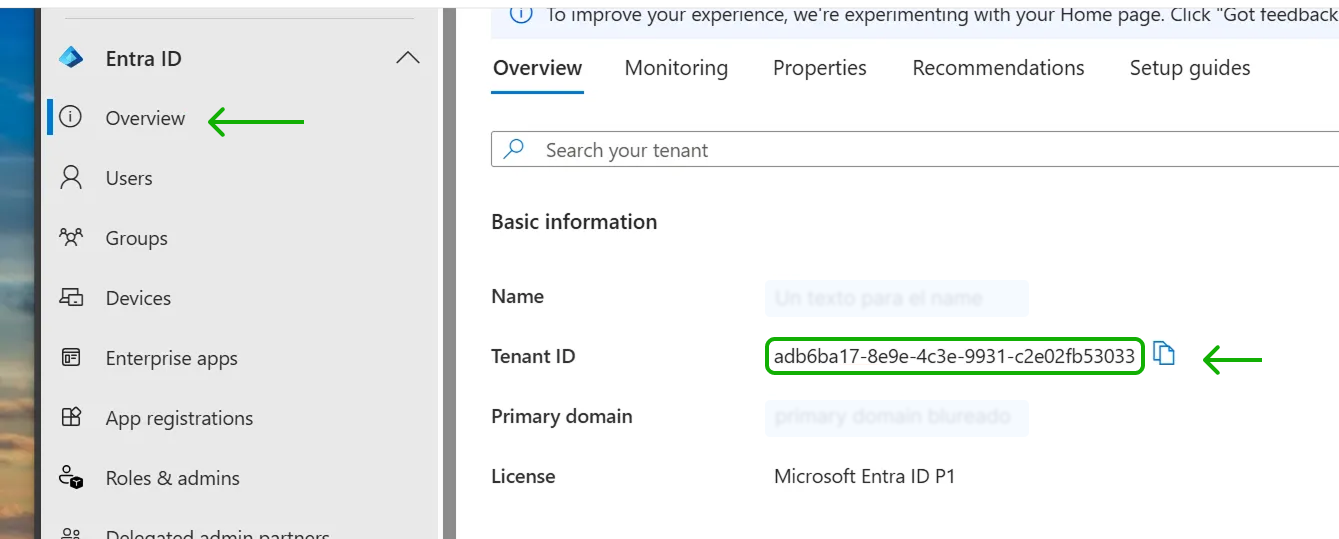
The other fields (Privacy Policy, Terms of Service and User Agreement) are recommended for legal compliance. The URL should point to the web pages of the company. For instance, in the case of Secrets Vault private privacy, we put the URL of the policy published in our site (https://secretsvault.xyz/privacy-policy/).
All client fields except the Client ID can be modified later. You are now ready to configure the Visual Passcodes tenant as an MFA service for EntraID. Let's proceed to EntraID configuration.
3. Configure Entra ID
3.1 Configure a new external authentication provider (Visual Passcodes)
To configure a multitenant application, the provider admin must first:
3.1.1. Create an Microsoft Entra ID tenant if they don't have one yet
It is assumed that you already have a Tenant (e.g., O365 domain). Otherwise, you should follow these steps to create a new one: https://learn.microsoft.com/en-us/entra/identity-platform/quickstart-create-new-tenant
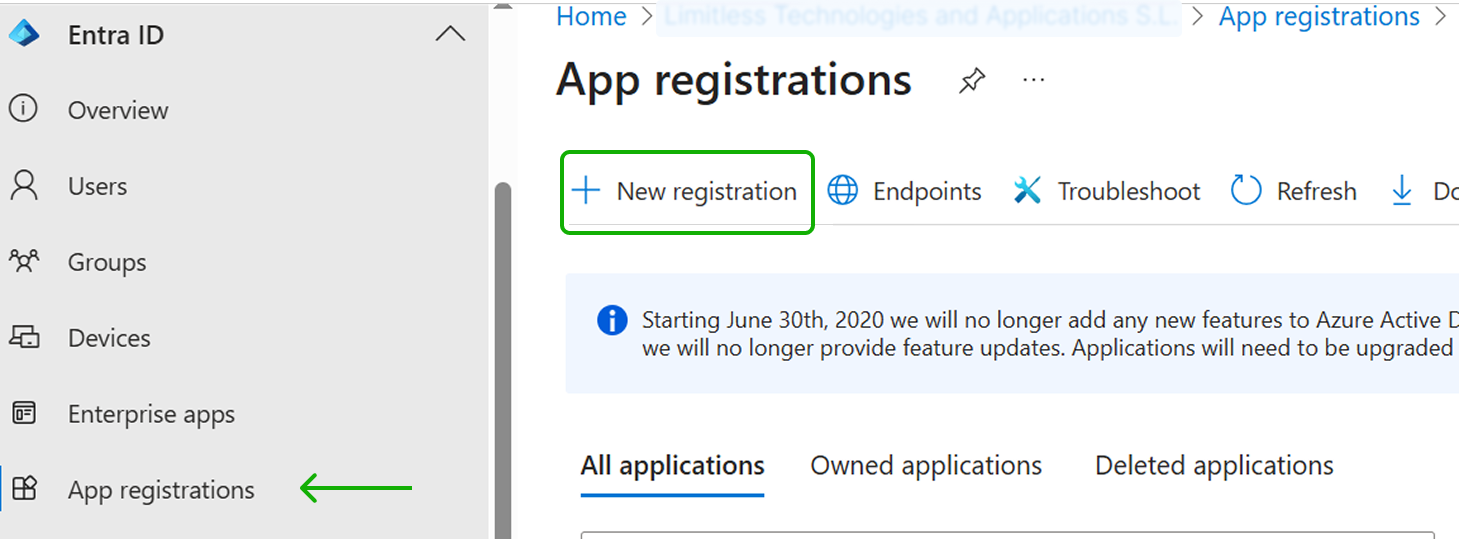
3.1.2 Register the IdP application in the EntraID tenant
Select the App registrations menu in EntraID and click on New registration.
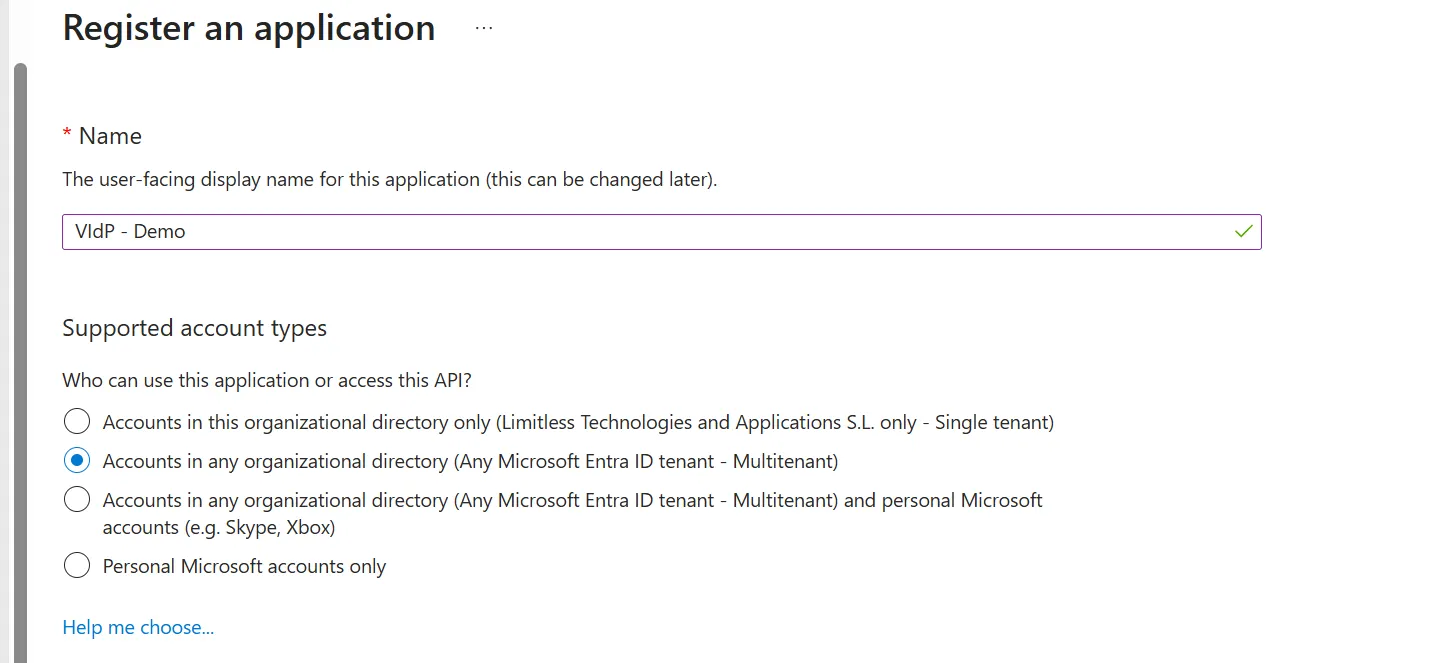
3.1.3 Set the Supported Account types of the application
You can restrict to accounts in your domain (tenant) or allow any O365 domain account. In the latter case, choose the "Accounts in any organizational directory (Any Microsoft Entra ID tenant - Multitenant)" option.
3.1.4 Add the external identity provider’s valid authorization_endpoint
In the same Register Application form, add in the redirect URI option the OIDC authorization endpoint URL of the Visual Passcodes:
https://{$VP_domain_name}/api/flow/microsoft-mfa/{$Tenant_id}/authorize
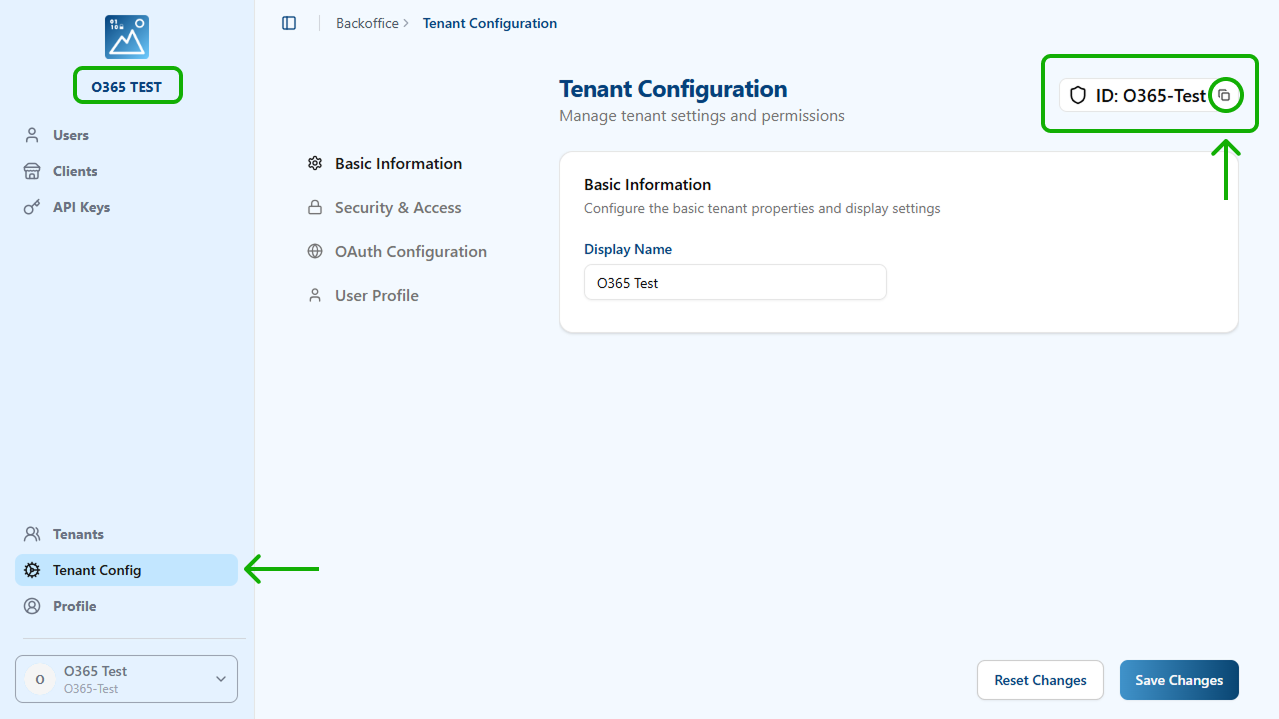
Tenant_id can be obtained from the Visual Passcodes configuration in the Tenant Config section, on the top right corner.
Metadata URL from:
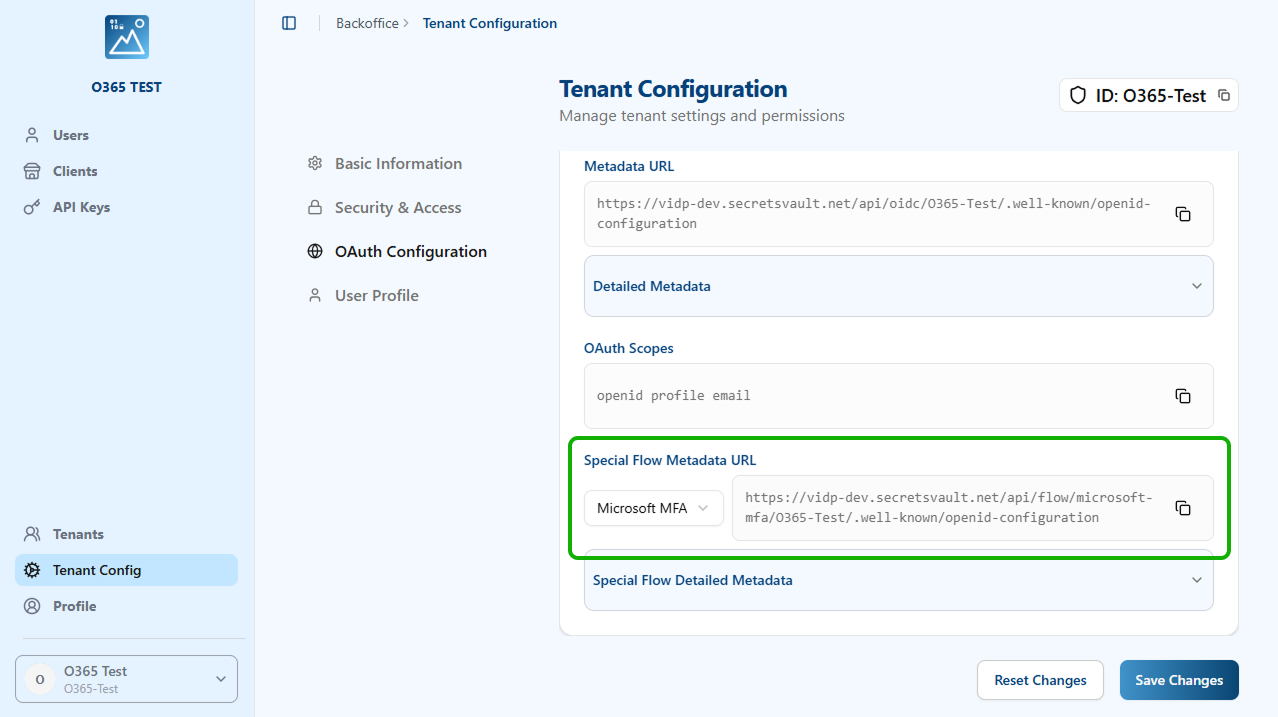
https://vidp-test.secretsvault.net/api/flow/microsoft-mfa/O365-Test/authorize
In the form, select Web type in the dropdown menu and enter the URL.

Finally, click the Register button to create the Application.
3.1.5 Add the delegated permission
From the left main menu, select the API Permissions menu. Then click on “Add a permission” option.
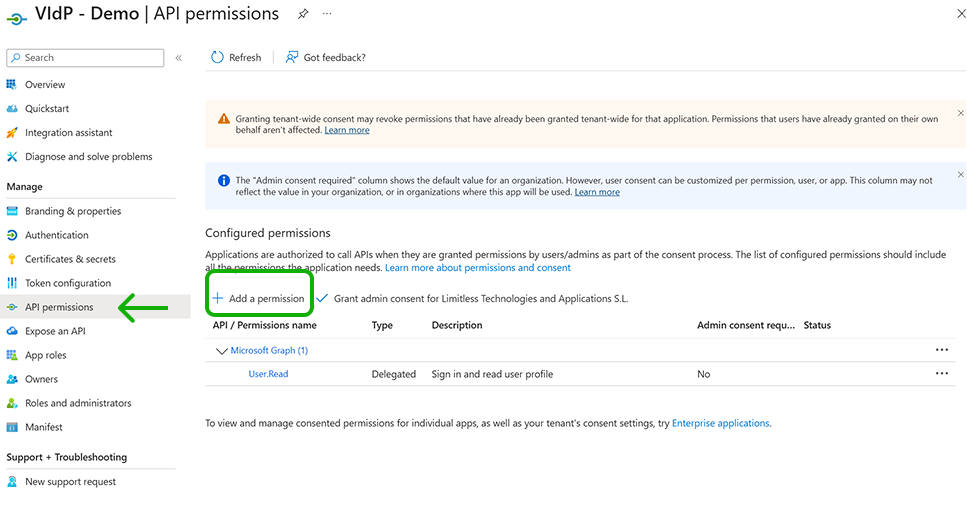
You need to add the openid and profile permissions (OIDC scopes) on Microsoft Graph to the application. Click on Microsoft Graph, select these permissions in the new window, and click the "Update permissions" button.
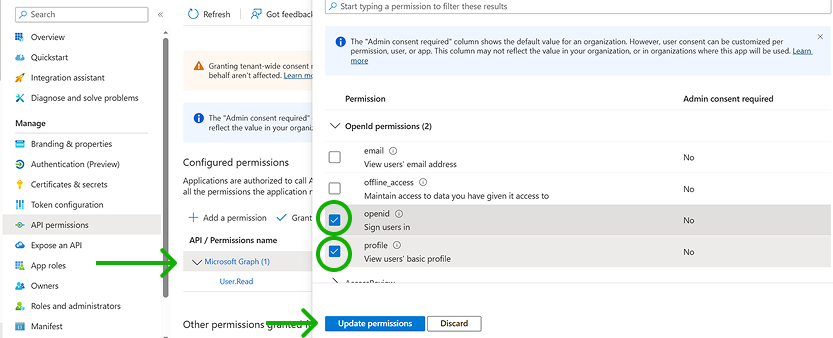
Don't select any other permissions (scopes) in this application.
Now we have the external Visual Passcodes application registered in the EntraID tenant. Next step is to register the Visual Passcodes as an External Authentication Method (EAM) available for this tenant.
3.1.6 Add the Terms of Service, Privacy Statement, and verify publisher
This step is optional, but important as best practice and provide trust to the delegated service. If these fields are left empty, users will see this message before accessing the Visual Passcodes provider.
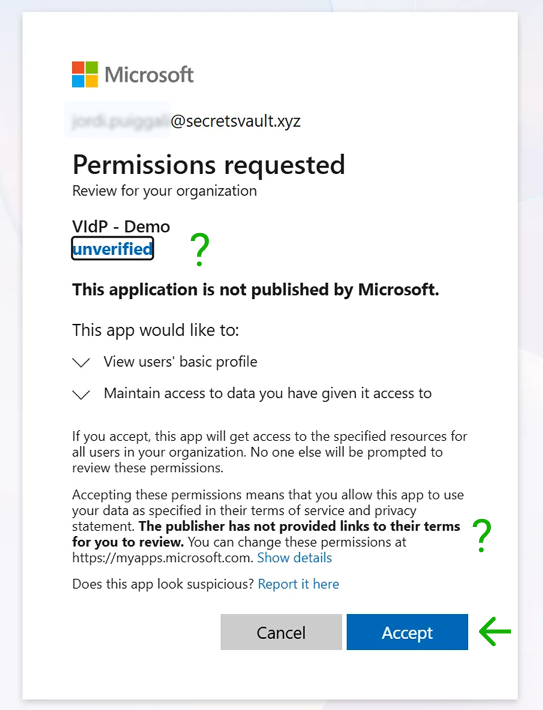
So Visual Passcodes users see that the service is not verified by Microsoft and there are no terms and conditions or privacy policy related to it.
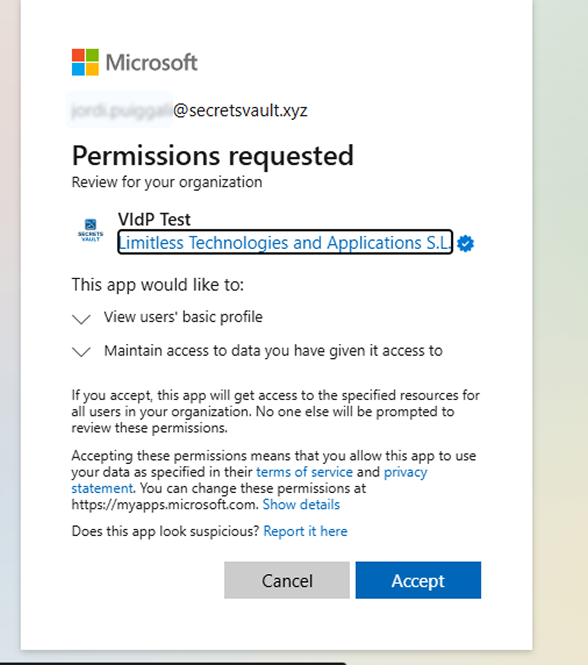
When verifying application and providing the terms and privacy information (and logo too) the message looks like this.
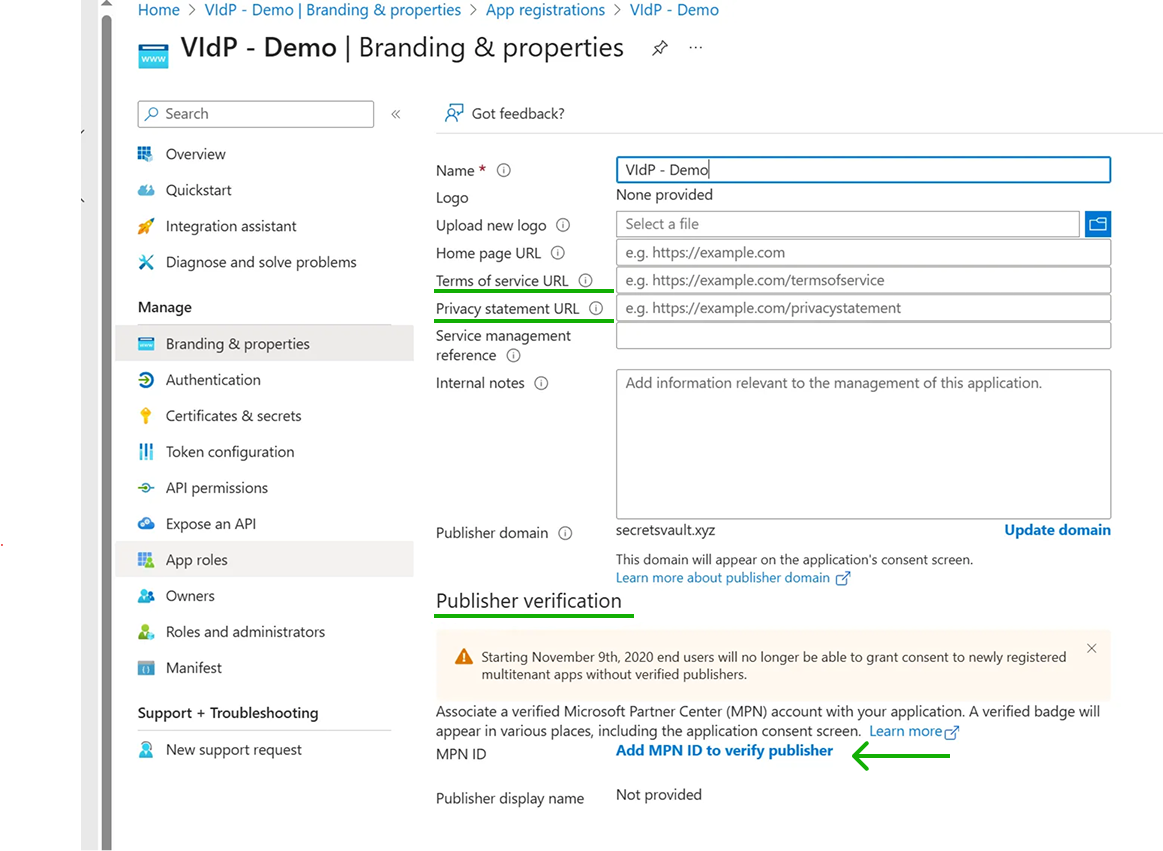
All these information can be provided in the “Branding & properties” submenu, when selecting the application from the “App registrations” menu.
4. Add Visual Passcodes as an EAM
4.1 Prepare information
To create the EAM, you need to specify some values from Visual Passcodes and the application registered in EntraID (completed in the previous section). This information can be obtained as follows.
4.1.1 Visual Passcodes Client ID and Discovery Endpoint
The Client ID is obtained from the OIDC Client details of the Visual Passcodes tenant. This is available from the "Clients" menu option in Visual Passcodes.
Discovery Endpoint information is found in the OAuth Configuration section of the Tenant Config menu option.
https://vidp-test.secretsvault.net/api/flow/microsoft-mfa/O365-Test/.well-known/openid-configuration
4.1.2 Application ID
The Application ID (App ID) is obtained from the EntraID administration center. It is accessible in the "App registrations" menu by selecting the application (registered in the previous section) and copying the Application ID value shown in the Overview submenu.
4.2 Register new External Authentication
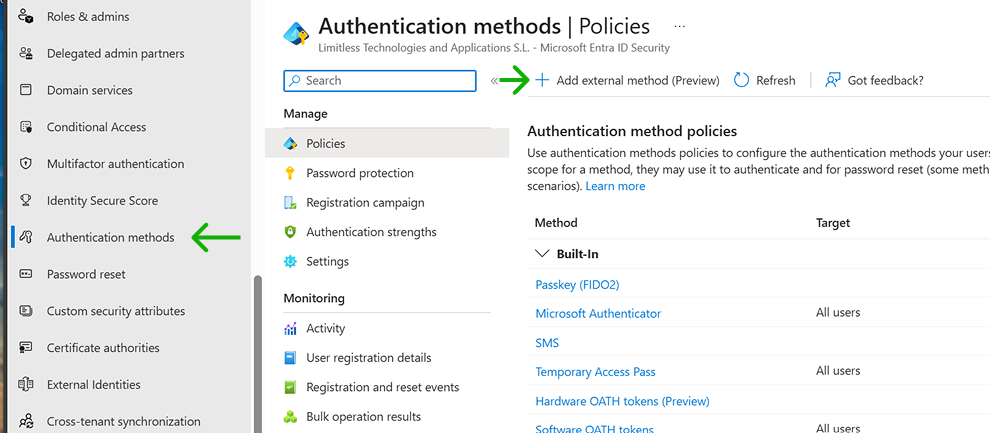
Go to the “Authentication methods” EntraID menu and select the option “+ Add external method (Preview)”
On the new page, give a user-friendly name to the Visual Passcodes authentication method and enter the data gathered from Visual Passcodes and the EntraID application (explained in the previous step).
- Name: A user friendly name
- Client ID: obtained form Visual Passcodes
- Discovery Endpoint: obtained from Visual Passcodes
- App ID: obtained from EntraID
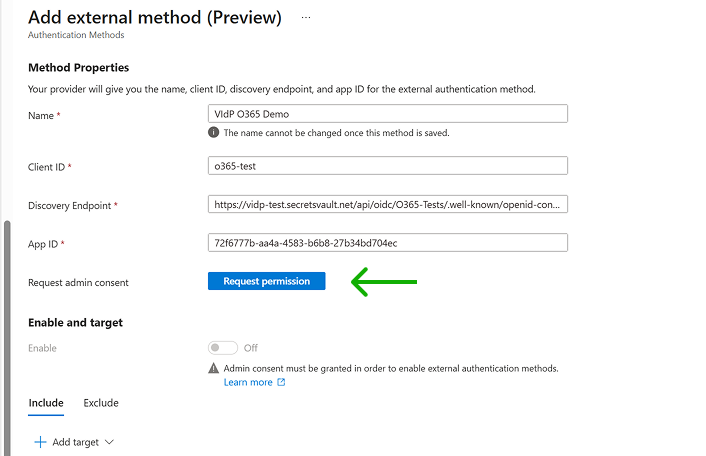
Save before continue to ensure data will not be lost.
To enable this authentication method, you need to "Request permission" first. EntraID admin access is required to grant the following permissions (the message may differ if the application has not been validated and/or terms and policy are unspecified).
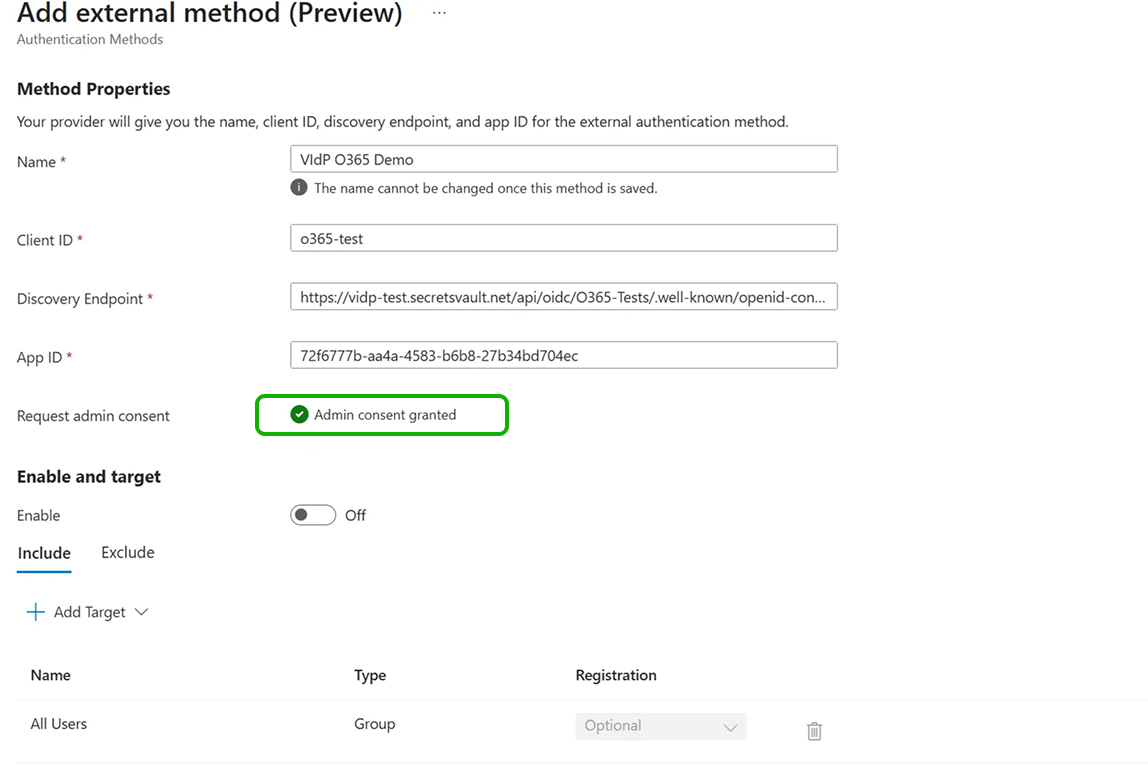
It may take some time for the green check to appear when validation is accepted. You can refresh the page if you do not see any update.
If you saved the information as suggested, you can recover the method since it will be available in the list.
Otherwise you will need to start again from scratch since the method has not been stored…
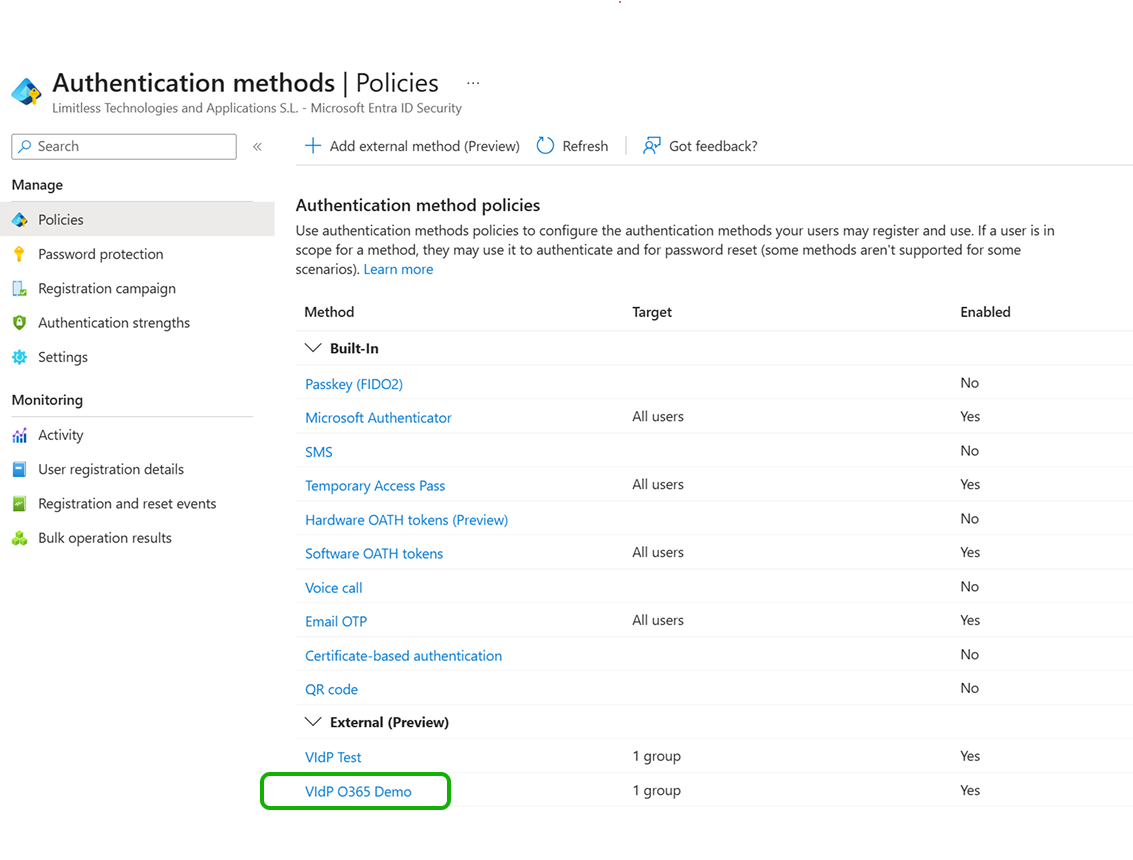
5. Enable EAM
Finally, you need to enable the EAM to make it available to your tenant users. This can be done while creating the method or later (recommended) when the method is validated.
To enable afterwards, click on the method and you will see the “Enable and target” menu. By default, the users include list has “All users” and therefore, enabling at this moment makes the method available to everybody. If you want to restrict this method to specific users or a group, select the “+ Add target” before enabling the method. You will have a page that allows you to choose users or groups setup in your O365 tenant. You can also keep All users and use the Exclude tab instead for blacklisting users or groups.
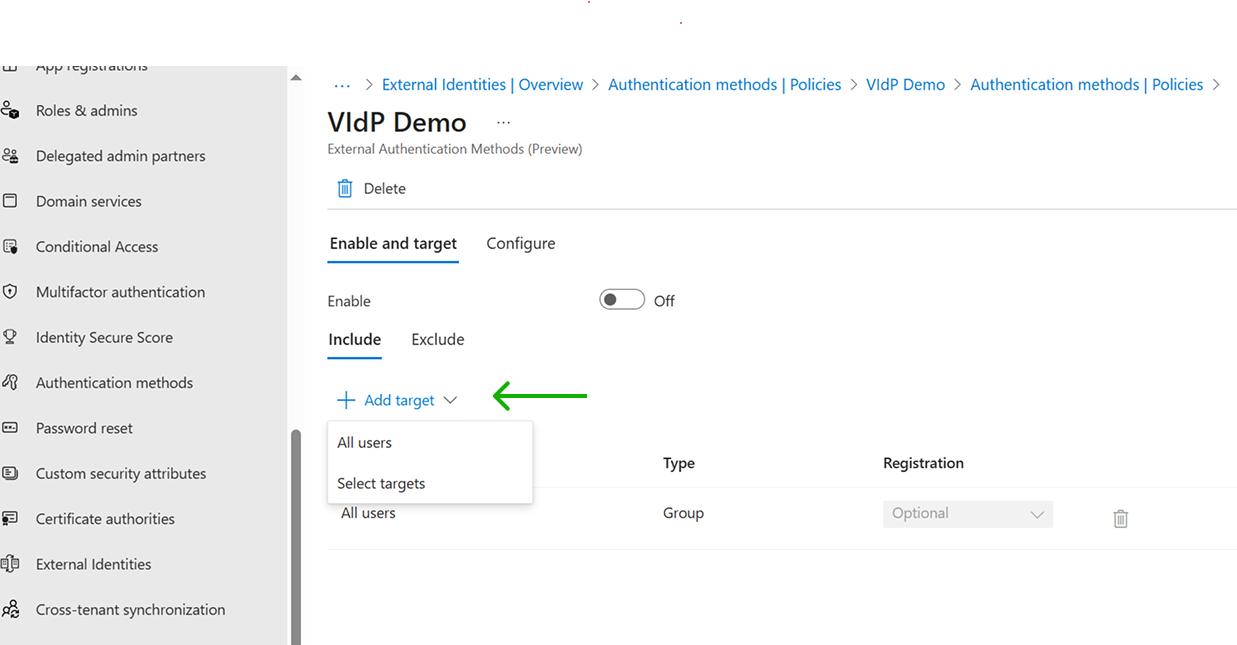
Once you have specified the users who will or will not have access to the new method, you can enable it.

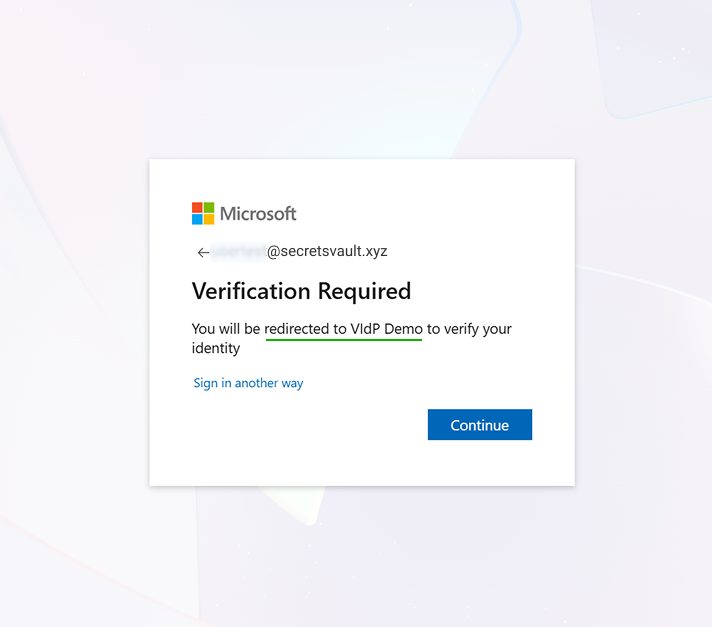
When the method is enabled, users will be redirected to the Visual Passcodes when MFA is required: